Understanding Light in Photography - Beginner Guide
- Prathibha Muralidhara
- Apr 26
- 9 min read

If you are looking to improve your photography, this article will get you started with the basics of understanding light in photography. I have written several articles and destination guides related to travel photography.
You can find them here -
“This post contains affiliate links (Werbung). If you buy through these links, I may earn a small commission at no extra cost to you.”

I’m a travel and street photographer with a passion for storytelling through images. Alongside photography, I enjoy travel writing and sharing knowledge of photography to help beginners explore this art. Over the past two years, I’ve dedicated myself to mastering different travel photography genres, capturing hundreds, if not thousands, of moments in every place I’ve visited, in every street I have walked and presented them through my own unique perspective and narrative style.
When I travel, for local experiences as a Photographer, I book through Getyourguide App where you can carefully plan the trip based on where you want to go, what you want to see and what you want to experience. Here you can find the link to the app and get a discount using the code - PRATHIMURALIDHARA5
In this Guide:
Understanding Light in Photography
Types of Light
Light quality
Direction of Light in Photography
Colour temperatures in Photography
Important tips to elevate your photography
Useful applications and products for managing light in Photography

Understanding these fundamental aspects of photography is extremely key to taking great travel photos. When you travel to different places on Earth, the type, quality and source of light is very different. This guide will help you understand just that and help you take better travel pictures in different types of light.
Types of Light
Natural Light
As the name suggests, light from a natural source, such as Sunlight and Moonlight, belongs to this category. The intensity and quantity of the natural light change throughout the day and are influenced by weather conditions. It's vital to plan ahead, be prepared and understand the Sun's path if you are shooting Landscapes and Nature.
For street photography, I prefer shooting mid-day as it produces great light and shadow interplay. But using a UV filter for your lens might be of great advantage. Modifiers like reflectors and V-flats can help you if you have a product or a portfolio shoot.
I buy all my lens filters from KF Concepts - Their filters are reliable and of great quality and budget friendly.
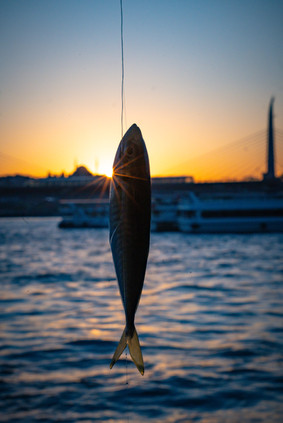
Golden Hour is photographers favorite. This is the light produced by the sun when its low lying. Its soft, warm, not creating the harsh light and shadows. Perfect for silhouttes and great story telling. You can produce high-quality images with very minimal effort.
TIP: a good weather app or a sun position app can give you exact Golden Hour Time which will help you in your travels for Golden Hour Photography. I use this.

Blue Hour The time just before and after sunset is termed as a the Blue Hour. Its the time when you dont see the light fully awake, but awake enough to show us the outline of the skyline, the landscapes, mild silhouttes. The good part is, it happens also twice a day!
Blue light is also very particular and unique in a way that, the light that you see during this time does not appear any part of the day except for that hour.
Shooting in blue light is particularly hard and needs a bit of planning and understanding of the light and kind of subjects that you can shoot. Keep in mind that any subject that you shoot in blue light will always have a blue tint and temperature in it. You could leave it as it is or increase or balance the temperature
It is indeed very hard to choose multiple subjects to shoot in the Blue Hour - Let me tell you, what works the best - City Scapes, Mountains and Ocean Landscapes. Here are some of my own examples -


Artificial Light: Covers a wide range of light sources. Camera attached Flash, constant lights including LEDs and also lamps. Unlike natural light, artificial lights can be precisely controlled. Sometimes artificial lights are used in addition to natural light, in order to augment it rather than replace it. For example, to create stronger shadows on an outdoor portrait shoot.
The biggest advantage of artificial light in photography is to be able to control the light source and precisely get the results as you want. Not only with the intensity of light but with the direction of light, the kind of effect the light can produce and the form of light that can be used etc.
I have started experimenting with Flash and I can highly recommend. As I use Sony camera, the best choice of flash was this. Its sturdy, affordable in comparison to the Sony Flash.
Here are my first results:


Quality of Light
Hard Light: They say this quality of light is photographer's worst nightmare and I partially disagree. A lot of my pictures, especially of that of street photography needs this harsh quality of light. This type of light produces sharp shadows and high contrast. It is almost all the time created by direct sunlight or reflection of a direct sunlight.
You will have to make sun your friend and not your enemy. Over many years of working with hard light, here are some points that help me work with it more efficiently.
- Shoot on Manual - You can set your exposure manually, to prevent camera from overexposing the highlights
- Understand the direction of hard light. Hard light peeping through corners create a beautiful effect and placing subjects can add an additonal layer and depth in your photos
- Work with ISO between 100-200 if there is no shadow and you are only working with harsh mid day sun
- And if you are using Flash - use the "high speed sync" mode


Soft Light: Creates diffused shadows and a more even tone. It is usually achieved through overcast skies or diffusers. Division between light and shadow becomes more even and smoother. You will notice the soft light effect on your camera or during your post processesing when there is no extreme highlights and shadows highlighted. Excellent examples of soft light is during a rainy day, when you use uniform soft box in a studio set up or when you use a diffuser.


Direction of Light
This is by far, according to me, the most important aspect of light in photography that you would need to understand to elevate your photos. Because each direction of light is important and is used for specific reasons.
There is essentially 3 different directions of Light
Front Lighting: Illuminates the subject evenly but can flatten features.
Side Lighting: Adds dimension and texture by casting shadows.
Back Lighting: Creates silhouettes and can highlight outlines of subjects.
Let me break it down with examples:
Front Lighting
Light coming either from behind the camera or the camera itself is essentially termed as Front light. Built in or light coming from the Flash is also termed as front light. The biggest advantage of using front light is even illumination of the subject in front of you.
This direction of light is also helpful if you want to illuminate the subject during low light or night light (of course.. with use of flash).
When you are using front light, manage your exposure optimally.
I always like to work by setting exposure a little low. In this way, I have a range to work with during post processesing without loosing a lot of information due to front light and over exposure.

An example here is front light appearing from flash directly on the subject (cat) - highlights its features uniformly.
Side Lighting:
Light from any light source, falling onto the subject at a 90 degree angle. One side being well illuminated and the other one with a little shadow mask. This direction of light adds a beautiful depth to your image. This lighting in my opinion gives is the only form of lighting giving the subject the three dimensional sense. At the same time, you will have to be careful on working with the underexposed region (where the light is not falling). This could be something that can be worked around in post-processesing.
Another solution, would be to use a reflector on the underexposed side to even out high contrast areas.


As an example in the above images: You can see the side light falling on the faces of the masai tribe from the side but also an under exposed area needing slightly increased exposure or decreased contrast. But all in all, both images have beautiful depth and story telling due to side lighting.
Back lighting:
When the light source is behind the subject and in front of the camera. Silhoutes is something that you have often heard about and seen in many photographs and this is acheived by back lighting. Back lighting can pose challenges with exposure and composition. If understood, practiced and composed well, back lighting can produce dramtic and cinematic images.
The ways you can improve your skills in working with back lighting is havin the right camera settings (I use a wide aperature f2.5, ISO around 100-200 and a shutter spped between 1/200 to 1/640), choosing golden hour as the time of the day and by experimenting different angles. Spot metering and adjusting white balance is also key to get dramatic back lit images.


Color of Light
Light has different color temperatures, measured in Kelvin (K). Understanding these can help in achieving the desired mood:
Warm Light
Warm light refers to light with yellow, orange, or reddish tones, typically found at lower color temperatures (around 2000K–4000K). Mostly found during sunrise, sunset, or from indoor tungsten lighting. Key aspect is that, it creates a soft, golden look that enhances skin tones, adds depth, and gives images a cozy, emotional, and cinematic feel.
I often use warm light for portraits and places where I need colors to pop and also because it feels natural and inviting, and it can be captured through timing (golden hour), adjusted using white balance settings, or enhanced during post-processing.

Neutral light
Simply refers to light that has a neutral color tine without any strong warm (yellow/orange) or cool (blue) casts. It typically falls around 4500K–5500K on the color temperature scale, similar to midday daylight.
This type of light gives colors accurately and consistently, making it ideal for situations where true-to-life color is important. I prefer neutral light in summers where the light is more and this color tone produces clean, realistic images with minimal color bias.

Cool Light
Cool light refers to light with blue or bluish-white tones, typically found at higher color temperatures (around 6000K and above). For example, cool light is prominent during overcast days, in shade, or sometimes during midday sunlight.
It creates a clean, crisp look with cooler color casts that can make scenes feel calm.
A common tone of light for landscape photography is usually cool light.

Final essential tips for working with Light
Shoot during the best light if you are a beginner - Safest bet is during the Golden Hour
Control Light with adjusting the white balance - Learn the different color tones in Light
Pay attention to the direction of light and what it illuminates
Keep in mind, always what mood the place deserves and dedicate more time during that hour of the day
Light changes during the day, during seasons and even around the world so adjusting your settings accordingly will help you elevate your work
I have 3 key cheet sheets on " Light in Travel Photography " - you can check them out here
Here are some of the useful apps and products I use that help me with managing light for my Photography -
Photo Pills
Conclusion
Mastering light in photography is essential for creating compelling images. By understanding its types, qualities, direction, and color, photographers can significantly improve your work and convey their intended message effectively.


Comments